
You are viewing this post: Best Choice arduino led Update New
บทความอัพเดทใหม่ในหัวข้อ arduino led
Make a Simple LED Circuit – Arduino Project Hub Update
09/03/2018 · Uses Arduino UNO and GY-WS2812B-8 RGB LED Module from DIYmall. LED Emergency Lights using WS2812 RGB LED Module. Project tutorial by bigboystoys13. 23,076 views; 10 comments; 42 respects; Arduino tutorial: LED Matrix red 32×8 256 Led driven by MAX7219 (or MAX7221) and Arduino Uno.
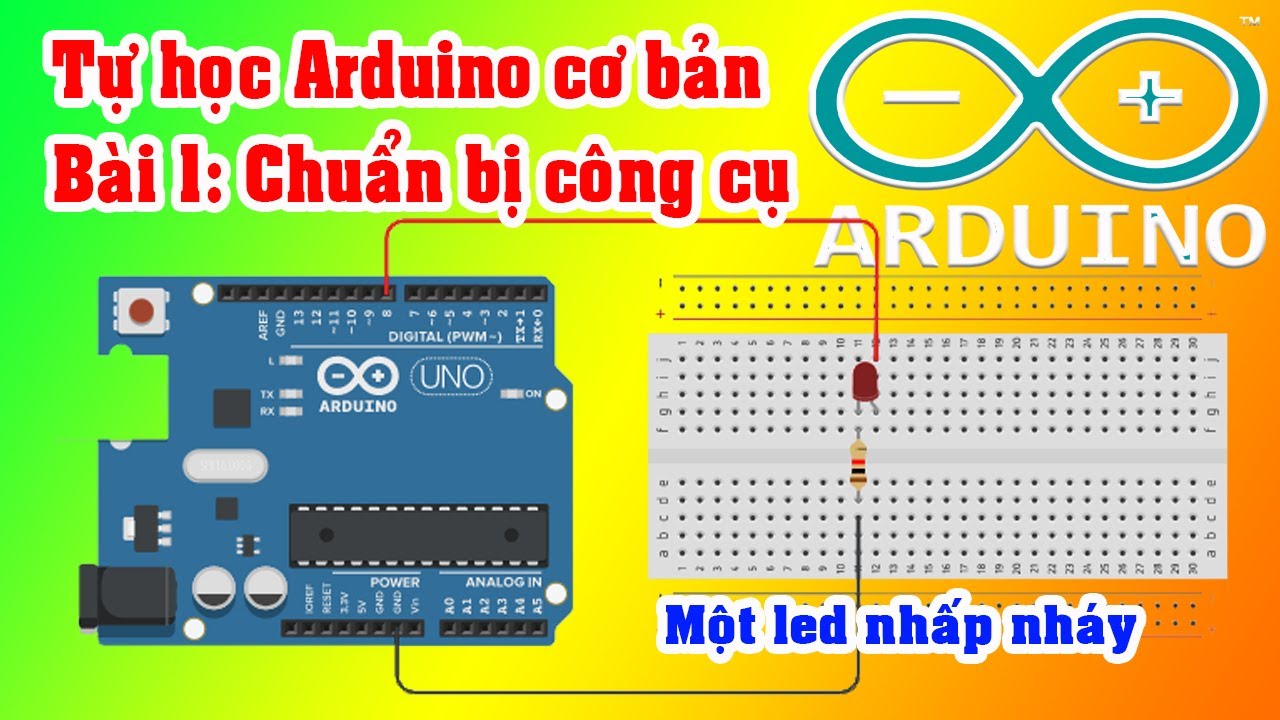
Tự học Arduino bài 2: Điều khiển LED bằng nút nhấn New Update arduino led
ดูข้อมูลที่เป็นประโยชน์เพิ่มเติมในหัวข้อ arduino led
BANLINHKIEN.VN XIN GỬI VIDEO : \” Tự học Arduino bài 2: Điều khiển LED bằng nút nhấn \”.\nĐÂY LÀ KÊNH YOUTUBE CHÍNH THỨC CỦA BLK, ẤN ẤN SUBSCRIBE NGAY NHÉ ĐỂ ỦNG HỘ BÊN MÌNH \n———————————————————————-\nBài trước chúng ta đã đi tìm hiểu về cách xuất dữ liệu số trên Arduino thông qua ví dụ về chớp tắt LED đơn, Hôm nay chúng ta sẽ cùng tìm hiểu về đầu vào số của Arduino thông qua các ví dụ đơn giản là điều khiển LED bằng nút nhấn, giao tiếp nút nhấn. Chuỗi video này sẽ giúp các bạn tự học Arduino 1 cách dễ dàng nhất với bộ KIT học tập Arduino cơ bản.\n☞ Facebook Miền Bắc : https://www.facebook.com/banlinhkienMH/\n☞ Facebook Miền Nam : https://www.facebook.com/banlinhkiennhattao.vn/\n☞ Website : http://banlinhkien.vn\n☞ Link đăng ký để theo dõi nhiều video hơn : https://www.youtube.com/channel/UCSeca92q0ZaRIcLOcsNsQyg?sub_confirmation=1\n———————————————————————-\nBanlinhkien.vn là kênh YOUTUBE của linh kiện điện tử Minh Hà chuyên mua bán linh kiện điện tử. Youtube Banlinhkien.vn hứa hẹn sẽ là cộng đồng điện tử nơi chia sẻ kiến thức, hướng dẫn test sản phẩm, chế đồ điện tử và review, so sánh các sản phẩm công nghệ mới giúp mọi người cập nhập được nhịp đập công nghệ.\nLink bài 1: Tìm hiểu về cách xuất dữ liệu số trên Arduino thông qua ví dụ về chớp tắt LED đơn\nhttps://www.youtube.com/watch?v=rUNlCKcWTPg\u0026t\n- Dưới đây là link mua linh kiện điện tử trong video :\n+ Bộ Kit Học Tập Arduino UNO R3 Cơ Bản giảm giá còn 359k\nhttps://banlinhkien.com/bo-kit-hoc-tap-arduino-uno-r3-co-ban-p8231821.html\n\n———————————————————————-\n- Số điện thoại liên hệ : 1900.03.44\n- Địa chỉ cơ sở để bạn mua Linh Kiện Điện Tử Minh Hà:\n+ Cơ Sở 1 – ĐH Bách Khoa/ Số 84, Đại Cồ Việt, Hà Nội.\n+ Cơ Sở 2 – ĐH Công Nghiệp/ Số 2 ngách 132/86 Nguyên Xá, Đường 32, Từ Liêm, Hà Nội.\n+ Cơ Sở 3 – HVKT Quân Sự/ Số 25 Đặng Thùy Trâm, Cầu Giấy, Hà Nội.\n+ Cơ Sở 4 – Chợ Nhật Tảo/ Số 106/5/ Nguyễn Kim/ P.6/ Q.10/ HCM.\n———————————————————————–\n☞ HÃY ĐỂ LẠI COMMENT ĐÓNG GÓP Ý CHO BÊN MÌNH NHA.
arduino led ภาพบางส่วนในหัวข้อ

Arduino – LED – Blink | Arduino Tutorial อัปเดต
Connect Arduino to PC via USB cable. Open Arduino IDE, select the right board and port. On Arduino IDE, Go to File Examples 01.Basics Blink example. . /* Blink Turns an LED on for one second, then off for one second, repeatedly. Most Arduinos have an on-board LED you can control. On the UNO, MEGA and ZERO it is attached to digital pin 13, on …
[Lập trình Arduino cơ bản] Bài 4 – Điều Khiển 8 Led Đơn Với Nhiều Hiệu Ứng Đẹp Mắt 2022 New arduino led
ข้อมูลเพิ่มเติมเกี่ยวกับหัวข้อ arduino led
Bài 4 – Điều Khiển 8 Led Đơn Với Nhiều Hiệu Ứng Đẹp Mắt\n——————————————————————–\nHiệu ứng 1: Điều khiển 8 led nhấp nháy\nHiệu ứng 2: Điều khiển 8 led sáng chạy từ trái qua phải\nHiệu ứng 3: Điều khiển 8 led sáng chạy từ phải qua trái\nHiệu ứng 4: Điều khiển 8 led sáng dồn và tắt dồn từ trái qua phải\nHiệu ứng 5: Điều khiển 8 led sáng dồn và tắt dồn từ phải qua trái\nHiệu ứng 6: Điều khiển 8 led sáng dồn và tắt dồn từ 2 bên vào trong\nHiệu ứng 7: Điều khiển 8 led sáng dồn và tắt dồn từ trong ra 2 bên\nHiệu ứng 8: Điều khển 8 led sáng xen kẽ\n——————————————————————-\n✔️.Xin cám ơn tất cả các bạn đã xem và ủng hộ Kênh. Bất kỳ thắc mắc, đóng góp hoặc Liên Hệ Tài Trợ, Quảng Cáo, Hợp Tác có thể gửi mail qua địa chỉ: [email protected]\n📌.Bạn nào muốn mua Module Arduino hay các thiết bị điện tử thông minh khác thì có thể tham khảo website:\n🌐. http://www.hasonmatic.com\n\n✔️. Bản quyền thuộc về Channel HÀ SƠN MATIC©️\n⛔️. Copyright by HÀ SƠN MATIC©️\n⛔️. Do not Reup\n\n🤠CHÚC CÁC BẠN LUÔN LUÔN HẠNH PHÚC VÀ THÀNH CÔNG🤓
arduino led ภาพบางส่วนในหัวข้อ
![arduino led 2022 [Lập trình Arduino cơ bản] Bài 4 - Điều Khiển 8 Led Đơn Với Nhiều Hiệu Ứng Đẹp Mắt](https://i.ytimg.com/vi/-2b0segldIQ/hq720.jpg)
Đèn LED | Cộng đồng Arduino Việt Nam Update 2022
3. LED dán (SMD) Loại LED này có thể hơi lạ với các bạn, nhưng đừng lo lắng, bạn có thể ý những con LED cực kì nhỏ trong mạch Arduino của bạn không, …
8x8x8 LED CUBE WITH ARDUINO UNO 2022 Update arduino led
ข้อมูลใหม่ในหัวข้อ arduino led
Source code and schematic can be found on my GitHub\nhttps://github.com/itsharryle/LED_CUBE\n\nPART LIST:\n5mm diffused blue LEDs x 512\n20 AWG tinned copper wire\n5V 10A regulated switching power supply\nRibbon cables\nPN2222 transistors x 16\n220 ohm resistors x 64\n74HC595 shift registers x 9\nArduino Uno R3\n\nSolder\nSoldering iron\nPrototyping board\nWires\nButtons\nRed LED\nGreen LED\n\nWooden board\nWood glue\nClamps\nSpray paint\nFoam boards
arduino led ภาพบางส่วนในหัวข้อ

Arduino RGB LED Tutorial – Arduino Project Hub Update New
26/12/2018 · Arduino RGB LED Circuit Diagram. Connect the cathode of the RGB led which is the longer pin of RGB led to the GND of Arduino and the other three pins to the pin 11, 10, 9 of Arduino through the 220 ohm resistors. The resistors will prevent the excess amount of current to flow through the RGB led.
+ อ่านข้อมูลเพิ่มเติมได้ที่นี่
Tự học Arduino bài 4: Điều khiển LED Matrix 2022 Update arduino led
อัพเดทใหม่ในหัวข้อ arduino led
BANLINHKIEN.VN XIN GỬI VIDEO : \” Tự học Arduino bài 4: Điều khiển LED Matrix \”.\nTiếp nối chuỗi video tự học Arduino, video ngày hôm nay mình và các bạn sẽ cùng tìm hiểu cách điều khiển led matrix 8×8 bằng arduino UNO với bộ KIT học tập Arduino UNO R3 cơ bản.\n———————————————————————-\nLINK SẢN PHẨM\n+ Bộ Kit Học Tập Arduino UNO R3 Cơ Bản\nhttps://banlinhkien.com/bo-kit-hoc-tap-arduino-uno-r3-co-ban-p8231821.html\n+ KIT Arduino UNO R3 CH340G\nhttps://banlinhkien.com/kit-arduino-uno-r3-ch340g-p6649363.html\n+ Bộ Kit Học Tập Arduino UNO R3 RFID\nhttps://banlinhkien.com/bo-kit-hoc-tap-arduino-uno-r3-rfid-p8231820.html\n+ Led Matrix 8×8\nhttps://banlinhkien.com/search?q=Led+Matrix+8×8\n\nLink Code tham khảo:\n+ https://drive.google.com/file/d/1gt9Wytrm89qo-eKP40wpY2Ow6X7zpOfE/view?usp=sharing\n\nLINK NHẠC:\n+ Song: Markvard – Obsessed (Vlog No Copyright Music)\nMusic provided by Vlog No Copyright Music.\nVideo Link: https://youtu.be/4qkJ_nAG_w0\n———————————————————————-\nTHÔNG TIN KÊNH:\nBanlinhkien.vn là kênh YOUTUBE của linh kiện điện tử Minh Hà chuyên mua bán linh kiện điện tử. Còn Youtube Banlinhkien.vn là kênh cộng đồng điện tử nơi chia sẻ kiến thức, hướng dẫn sử dụng sản phẩm, test sản phẩm, dạy học điện tử, chế đồ điện tử và review, so sánh các sản phẩm công nghệ để giúp người xem có những sự lựa chọn tốt nhất, ngoài ra còn giúp người xem cập nhập được nhịp đập công nghệ, học tập, nâng cao kiến thức về điện tử và giải trí.\n☞ Facebook Miền Bắc : https://www.facebook.com/banlinhkienMH/\n☞ Facebook Miền Nam : https://www.facebook.com/banlinhkiennhattao.vn/\n☞ Website : http://banlinhkien.com\n☞ Link ĐĂNG KÝ KÊNH để theo dõi nhiều video hơn : https://www.youtube.com/channel/UCSeca92q0ZaRIcLOcsNsQyg?sub_confirmation=1\n———————————————————————-\nLIÊN HỆ \u0026 ĐỊA CHỈ :\n- Số điện thoại liên hệ mua hàng : 1900.03.44\n- Số điện thoại support: 024.66.85.11.66\n- Website: http://banlinhkien.com\n- Địa chỉ cơ sở để bạn mua Linh Kiện Điện Tử Minh Hà:\n+ Cơ Sở 1 – ĐH Bách Khoa/ Số 84, Đại Cồ Việt, Hà Nội.\n+ Cơ Sở 2 – ĐH Công Nghiệp/ Số 2 ngách 132/86 Nguyên Xá, Đường 32, Từ Liêm, Hà Nội.\n+ Cơ Sở 3 – HVKT Quân Sự/ Số 25 Đặng Thùy Trâm, Cầu Giấy, Hà Nội.\n+ Cơ Sở 4 – Số 71 Ngô Quyền – P.6 – Q.10 – HCM\n———————————————————————–\n☞ HÃY ĐỂ LẠI COMMENT ĐÓNG GÓP Ý CHO BÊN MÌNH NHA.\n#Banlinhkien
arduino led ภาพบางส่วนในหัวข้อ

Arduino – Blinking LED – Tutorialspoint ล่าสุด
Đang cập nhật
+ อ่านข้อมูลเพิ่มเติมได้ที่นี่
Nhập môn IoT với Lập trình Arduino: Bài 03 – Đèn LED nhấp nháy Update 2022 arduino led
ข้อมูลเพิ่มเติมเกี่ยวกับหัวข้อ arduino led
Chào dân chuyên ngữ đến với workshop IoT – Arduino\n\nVideo này nằm trong chuỗi bài giúp bạn từ Zero to Pro trong tiến trình chinh phục kiến thức IoT và Lập trình nhúng (Arduino)\n\nBạn sẽ được chỉ dẫn theo kiểu step by step, vừa thông lí thuyết vừa thạo thực hành, lập trình vui như showbiz…\n\n▶ Nội dung video:\n* Gà gáy báo thức\n* Xàm xí đầu giờ\n* Giới thiệu board mạch Arduino\n* Công cụ giả lập https://www.tinkercad.com/\n* Cấu trúc chương trình Arduino\n* Lắp mạch đèn LED đơn giản và nhấp nháy đi em\n* Code, code và code…\n\n▶ Lời cảm ơn:\nCảm ơn các thế hệ sinh viên đã nhiệt tình, kiên nhẫn \u0026 chịu đựng khi tham gia bài giảng. Các bạn mãi là niềm cảm hứng bất tận cho ngọn lửa nhiệt huyết trong giáo.làng luôn luôn bùng cháy!\nWelcome mọi feedback!\n\nHAPPY CODE – HAPPY MONEY\n\n▶\n© Bản quyền thuộc về giáo.làng | https://facebook.com/giao.lang.bis\n© Copyright by giáo.làng ☞ Please do not reup
arduino led ภาพบางส่วนในหัวข้อ

Bài 2: Cách làm đèn LED nhấp nháy theo … – Arduino Update
Đang cập nhật
+ อ่านข้อมูลเพิ่มเติมได้ที่นี่
Bài 1: Cài đặt Arduino, viết chương trình làm đèn led nhấp nháy theo yêu cầu | Tự học Arduino cơ bản New 2022 arduino led
ข้อมูลเพิ่มเติมเกี่ยวกับหัวข้อ arduino led
Đây là loạt video về Arduino cơ bản với đầy đủ các bài học cơ bản với led, cảm biến và các ứng dụng thực tế.\nMình không phải dân chuyên, tất cả là do mình tự học và muốn chia sẽ với các bạn có niềm đam mê như mình, nên video mình làm ra có thể có sai sót mong các bạn thông cảm và đóng góp thêm.\nMọi đóng góp ý kiến của các bạn là động lực để mình hoàn thiện hơn các video clip sau.\nChọn bộ các bài học https://www.youtube.com/playlist?list=PLe-j2rpPeZ3_cm6OO5gPwJsC_MHioLmkI\nLink tải phần mềm Arduino: http://www.mediafire.com/file/6h2cpv2twd3o6qi/arduino-nightly-windows.zip/file\nLink code: http://www.mediafire.com/file/8c8v4gdcgc09rpb/fantabulous_waasa1.ino/file\nLink file giảng có bài tập: https://www.mediafire.com/file/00zrkb54j39sf01/BAI_1.pptx/file\n=======================================================================\nTruy cập trang Blog để xem nhiều hơn: https://thanhtukgc.blogspot.com\nFacebook: https://www.facebook.com/thanhtu.khanhnhoc\nLiên hệ làm mô hình, đồ án nhỏ: [email protected] .\n#Arduino #arduinocoban #laptrinharduino #thanhtuvlogs
arduino led คุณสามารถดูภาพสวย ๆ ในหัวข้อ
Premier projet Arduino : Allumer des LEDs – Robot Maker New Update
05/05/2017 · Le montage Arduino et Breadboard. Commençons par le montage : 1. Connectez votre breadbord aux broches 5V et Ground (notée GND) de la carte. 2. Placez les 2 LEDs rouges et la LED verte sur la breadbord. 3. Attachez la cathode (patte courte de la LED) au Ground, via une résistance 220 Ohms, et ce pour chaque LEDs. 4.
Lập trình Arduino căn bản 2: Điều khiển 8 led đơn (Basic Arduino programming 2: Control 8 LEDs) 2022 arduino led
ข้อมูลเพิ่มเติมเกี่ยวกับหัวข้อ arduino led
Video chia sẻ nội dung: “Lập trình Arduino Uno điều khiển 8 led đơn: sáng dần, …….”\nLàm quen với cấu trúc vòng lặp for, cách sử dụng vòng lặp for:\nfor (initialization; condition; increment) {\n//statement(s);\n}\n(\nThe video shares the content: \”Arduino Uno programming with 8 single LEDs: light up, …….\”\nGet familiar with the structure of for loop, how to use for loop:\nfor (initialization; condition; increment) {\n// statement (s);\n})
arduino led ภาพบางส่วนในหัวข้อ

Como acender e piscar um LED no Arduino – tecdicas 2022 Update
1 LED; 1 Arduino com cabo (estamos utilizando a versão com 5v) 1 resistor de 220 ohms ou 120 ohms (dependendo do led que for utilizar) 1 protoboard e 2 fios (opcional) Neste guia soldamos um resistor na anodo do LED, portanto não utilizamos um protoboard, no entanto é possível utilizar um normalmente.
+ อ่านข้อมูลเพิ่มเติมได้ที่นี่
Hướng dẫn Arduino: Điều khiển tuần tự LED- Dự án dành cho người mới bắt đầu New 2022 arduino led
อัพเดทใหม่ในหัวข้อ arduino led
Arduino Tutorial: LED Sequential Control- Beginner Project\nInexpensive Arduino Starter Kit: http://amzn.to/1CqGEuB\n\nLink to Arduino IDE: https://www.arduino.cc/en/Main/Software\n\nLink to Sketch for this project: https://www.dropbox.com/s/bivwdnehp7ln1iq/Sequential_blinking.ino?dl=0\n\nToday I am going to show you guys a very simple arduino project for beginners. We’re going to get three different LEDs to turn on and turn off in a simple sequence, like you see here.\n\nFor this, you’re going to need an Arduino Uno or similar Arduino board, a breadboard (preferably with a positive and negative rail like this one), four breadboard jumper wires, a USB cable to for the Uno, three LEDs of different colors(here we are using Blue, Red and Green) and 3 220ohm resistors. Now we’re using 220ohm resistors, because they seem to work best with the LEDs we have- but you could use different resistors, depending on your LEDs and your circuit. I’ve put a link to an inexpensive arduino kit that contains all these components in the description below, in case you’re looking to get an arduino uno and all the basic components for this tutorial. \n\nSo lets first setup the hardware. The first step is to establish a common ground. To do this, use a jumper wire to connect the Ground pin on the arduino to the negative rail on the breadboard. This allows all the LEDs to use the ground pin on the arduino. Now we’ll insert the resistors into the breadboard. Space the resistors out with one leg connected to the the negative rail. Now its time to insert the LEDs. Before inserting the LEDs, its important to note that the longer of the two leads on most through-hole LEDs is the positive leads. Connecting it the wrong way, will cause this circuit to not work. Connect the negative lead of the LED to the horizontal rail on which the resistor is connected and connect the positive lead to an adjacent rail. Repeat this process for all three LEDs. Now its time to complete the circuit. We are going to use output ports 13, 12 and 11 for the input signal. Connect the positive lead of the LED on the right to pin 13, the LED in the center to 12 and the LED on the left to pin 11. The circuit is now complete. Power on the Arduino Uno by connecting it to your computer using the USB cable. The LEDs on the board turn on and the board powers up. \n\nBefore we work on our sketch, make sure to download the Arduino IDE for your specific operating system. I’ll leave a link to where you can download this software, in the description below. Once you’ve downloaded and installed the arduino IDE, go ahead and download the Sketch to run this program, using the link I’ve put in the description. \nhttps://www.dropbox.com/s/bivwdnehp7ln1iq/Sequential_blinking.ino?dl=0\n\nOpen the downloaded file. The program first creates 3 variables. LED1, LED2 and LED3. This allows us to change the output pins, without having to modify the entire program. The code in the setup part of the program tells the arduino that pins 13, 12 and 11 will be outputs. The loop portion of the program is where the actual instructions live. The first three digitalwrite functions turn on one LED at a time with a 200ms delay between each of them turning on. The next three digitalwrite functions turn off the leds with a 300ms delay between each LED. Now you can change the delay between each LED to change the rhythm of the LEDs turning on and off. I’ve found that using 200ms and 300ms gives it a nice smooth rhythm. Now you’re ready to upload the program to the board. Now click on the Tools tab of the Arduino Window, make sure the Arduino Uno is selected as your board and make sure you select the COM port your board is connected to. Most of the times there will be one COM port available and that will be the one you need to select. Click on the upload button on the top left hand corner of the screen to upload the program to the Uno. A green progress bar on the lower right hand corner will indicate upload progress. And unless any errors appear in the black message bar at the bottom of the screen, your board should now be running the program and the LEDs should be turning on and off like you can see here.\n\nHope this tutorial was useful. Please hit LIKE for more Arduino tutorials and subscribe to stay tuned.
arduino led คุณสามารถดูภาพสวย ๆ ในหัวข้อ

สอนใช้งาน Arduino สัญญาณ Digital OutPut ควบคุม LED ไฟวิ่ง … 2022 New
Arduino Web Sever (ควบคุม LED ด้วย Button) Arduino Web Sever (ควบคุม LED ด้วย Checkbox) Arduino Web Sever (using SD Card for Page Links) Arduino Web Sever (using SD Card for Show image) _____ Arduino control Motor . Arduino control Motor (เปลี่ยนservo SG90 motorให้หมุนได้360)
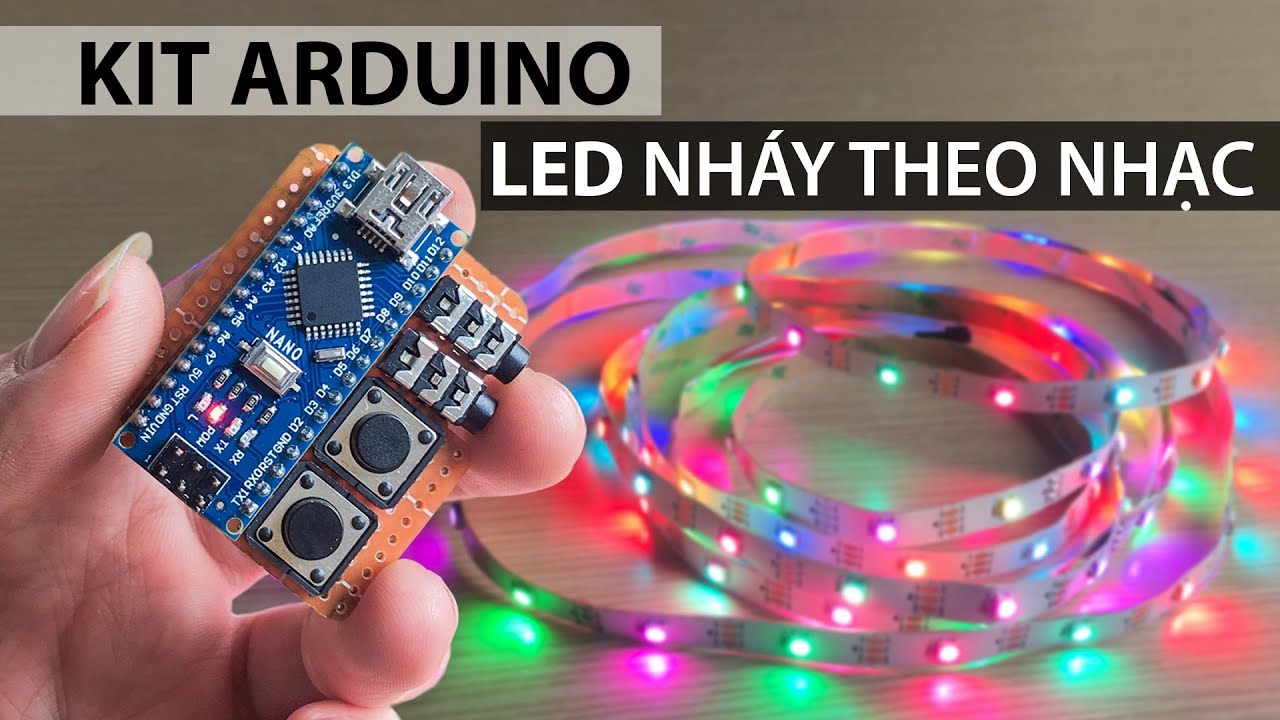
Chế mạch LED nháy theo nhạc bằng KIT ARDUINO 328 nano – Chơi tết New 2022 arduino led
ดูข้อมูลที่เป็นประโยชน์เพิ่มเติมในหัวข้อ arduino led
Dùng Kit Kit Arduino Nano 3.0 328 Mini CH340 để Chế mạch LED nháy theo nhạc bằng led dây dán 5050 RGB cuộn – Chơi tết \”.\nĐÂY LÀ KÊNH YOUTUBE CHÍNH THỨC CỦA BLK, ẤN ẤN SUBSCRIBE NGAY NHÉ ĐỂ ỦNG HỘ BÊN MÌNH \n———————————————————————-\n☞ Link đăng ký để theo dõi nhiều video hơn : https://www.youtube.com/channel/UCSeca92q0ZaRIcLOcsNsQyg?sub_confirmation=1\n☞ Facebook : https://www.facebook.com/banlinhkienMH/\n☞ Website : http://banlinhkien.vn\n———————————————————————-\nBanlinhkien.vn là kênh YOUTUBE của linh kiện điện tử Minh Hà chuyên mua bán linh kiện điện tử. Youtube Banlinhkien.vn hứa hẹn sẽ là cộng đồng điện tử nơi chia sẻ kiến thức, hướng dẫn test sản phẩm, chế đồ điện tử và review, so sánh các sản phẩm công nghệ mới giúp mọi người cập nhập được nhịp đập công nghệ.\n- Dưới đây là link mua linh kiện điện tử trong video :\n+ Kit Arduino Nano 3.0 328 Mini CH340 : https://banlinhkien.vn/goods-6135-kit-arduino-nano-3-0-328-mini-ch340.html\n+ Led Dây Dán 5050 WS2812 5V: https://banlinhkien.vn/goods-10704-led-day-dan-5050-ws2812-5v-khong-keo-1-met-60-bong-.html\n+ Nút Nhấn 4 Chân 12x12x8MM DIP: https://banlinhkien.vn/goods-9650-nut-nhan-4-chan-12x12x8mm-dip.html\n+ Jack Audio 3.5 PJ-313 5P (Loại Cắm) : https://banlinhkien.vn/goods-2078-jack-audio-3-5-pj-313-5p-loai-cam-.html\n+ Jump Đơn Cái 2.0MM 1x40P Thẳng : https://banlinhkien.vn/goods-1162-jump-don-cai-2-0mm-1x40p-thang.html\n+ Dây SM 2.54-2P 20CM : https://banlinhkien.vn/goods-5264-day-sm-2-54-2p-20cm.html\n+ PCB 7x9cm : https://banlinhkien.vn/goods-1225-pcb-7x9cm.html\n———————————————————————-\n- Số điện thoại liên hệ : 1900.03.44\n- Địa chỉ cơ sở để bạn mua Linh Kiện Điện Tử Minh Hà:\n+ Cơ Sở 1 – ĐH Bách Khoa/ Số 84, Đại Cồ Việt, Hà Nội.\n+ Cơ Sở 2 – ĐH Công Nghiệp/ Số 2 ngách 132/86 Nguyên Xá, Đường 32, Từ Liêm, Hà Nội.\n+ Cơ Sở 3 – HVKT Quân Sự/ Số 25 Đặng Thùy Trâm, Cầu Giấy, Hà Nội.\n+ Cơ Sở 4 – Chợ Nhật Tảo/ Số 106/5/ Nguyễn Kim/ P.6/ Q.10/ HCM.\n———————————————————————–\n☞ HÃY ĐỂ LẠI COMMENT ĐÓNG GÓP Ý CHO BÊN MÌNH NHA.
arduino led ภาพบางส่วนในหัวข้อ
Arduino学习(三)点亮LED灯_JoStudio-CSDN博客_arduino led ล่าสุด
22/09/2016 · arduino点亮一盏LED灯 一、所需材料 Arduino UNO、面包板、LED灯、220Ω电阻各一个,杜邦线。1、区分LED管脚:led引脚长的一端为正极,短的一端为负极。也可以仔细观察灯珠内部的电极,较小的是正极,大的一端的是负极。2、面包板说明:(1)面包板上最上面和最下面的两行插孔,是横向相通的,一般 …
Cách lập trình \u0026 điều khiển LED 7 THANH với ARDUINO #3 Update New arduino led
ข้อมูลเพิ่มเติมเกี่ยวกับหัวข้อ arduino led
BANLINHKIEN.VN GỬI VIDEO : \” Học ARDUINO bài 3 | Hướng dẫn Cách điều khiển LED 7 THANH với ARDUINO , video này sẽ hướng dẫn học và làm quen với ARDUINO cơ bản với nội dung lập trình và điều khiển LED 7 thanh thông qua bộ sản phẩm Bộ Kit Học Tập Arduino UNO R3 Cơ Bản \”.\nSau video các bạn có thể học được cách tự học arduino UNO R3 cơ bản, tự biết cách lập trình arduino với KIT Arduino UNO R3 cùng cách điều khiển LED 7 thanh vô cũng đơn giản.\nĐÂY LÀ KÊNH YOUTUBE CHÍNH THỨC CỦA BLK, ẤN ẤN SUBSCRIBE NGAY NHÉ ĐỂ ỦNG HỘ BÊN MÌNH \n———————————————————————-\n☞ Facebook Miền Bắc : https://www.facebook.com/banlinhkienMH/\n☞ Facebook Miền Nam : https://www.facebook.com/banlinhkiennhattao.vn/\n☞ Website : http://banlinhkien.vn\n☞ Link đăng ký để theo dõi nhiều video hơn : https://www.youtube.com/channel/UCSeca92q0ZaRIcLOcsNsQyg?sub_confirmation=1\n———————————————————————-\nBanlinhkien.vn là kênh YOUTUBE của linh kiện điện tử Minh Hà chuyên mua bán linh kiện điện tử. Youtube Banlinhkien.vn hứa hẹn sẽ là cộng đồng điện tử nơi chia sẻ kiến thức, hướng dẫn test sản phẩm, chế đồ điện tử và review, so sánh các sản phẩm công nghệ mới giúp mọi người cập nhập được nhịp đập công nghệ.\n\n- LINK SẢN PHẨM\n+ Bộ Kit Học Tập Arduino UNO R3 Cơ Bản : https://banlinhkien.com/bo-kit-hoc-tap-arduino-uno-r3-co-ban-p8231821.html \n———————————————————————-\n- Số điện thoại liên hệ : 1900.03.44\n- Địa chỉ cơ sở để bạn mua Linh Kiện Điện Tử Minh Hà:\n+ Cơ Sở 1 – ĐH Bách Khoa/ Số 84, Đại Cồ Việt, Hà Nội.\n+ Cơ Sở 2 – ĐH Công Nghiệp/ Số 2 ngách 132/86 Nguyên Xá, Đường 32, Từ Liêm, Hà Nội.\n+ Cơ Sở 3 – HVKT Quân Sự/ Số 25 Đặng Thùy Trâm, Cầu Giấy, Hà Nội.\n+ Cơ Sở 4 – Chợ Nhật Tảo/ Số 106/5/ Nguyễn Kim/ P.6/ Q.10/ HCM.\n☞ HÃY ĐỂ LẠI COMMENT ĐÓNG GÓP Ý CHO BÊN MÌNH NHA.\n———————————————————————–\n#dieukhienled7thanh\n#hocARDUINOcoban\n#ARDUINO
arduino led ภาพบางส่วนในหัวข้อ

ข้อมูลเพิ่มเติมเกี่ยวกับหัวข้อ arduino led
Đang cập nhật
คำสำคัญที่เกี่ยวข้องกับหัวข้อ arduino led
Tìm kiếm có liên quan cho arduino led
ดังนั้นคุณดูบทความหัวข้อเสร็จแล้ว arduino led
Articles compiled by Bangkokbikethailandchallenge.com. See more articles in category: MMO